Notifications
The S1 system includes a sophisticated notification mechanism that sends
real-time monitoring messages based on S1 configurations. To manage
notifications, select Administration  > Notifications
  .
.
The S1 system includes a variety of notification types: Verbose, Debug, Information, Warning, Error.
- Verbose: Provides the most detailed information about the system’s operations, including low-level debugging information that is useful for developers and system administrators troubleshooting issues.
- Debug: Provides information about system events and conditions that can aid in debugging and troubleshooting, including details about system configurations, performance statistics, and error messages.
- Information: Provides details about system events and conditions that are not necessarily critical but may be of interest to system administrators, such as software updates, configuration changes, and system status.
- Warning: Provides alerts about events or conditions that require attention but are not critical, such as a failed disk or a degraded RAID array.
- Error: Provides information about critical events or conditions that require immediate attention to prevent data loss or system downtime, such as a failed power supply or a critical system error.
Notification levels may be configured as either specific or hierarchical. When applying hierarchical notification, each level includes the previous levels. For example, if you set the notification level to “Information,” you will receive notifications for “Information,” “Warning,” and “Error” events and conditions. Specific notification means that the user gets only notifications that relate to a selective type of notification.
Ultimately, it’s important to configure the notification levels based on the criticality of the event or condition and the level of urgency required for resolution, to ensure that users receive notifications that require their immediate attention.
Querying the system
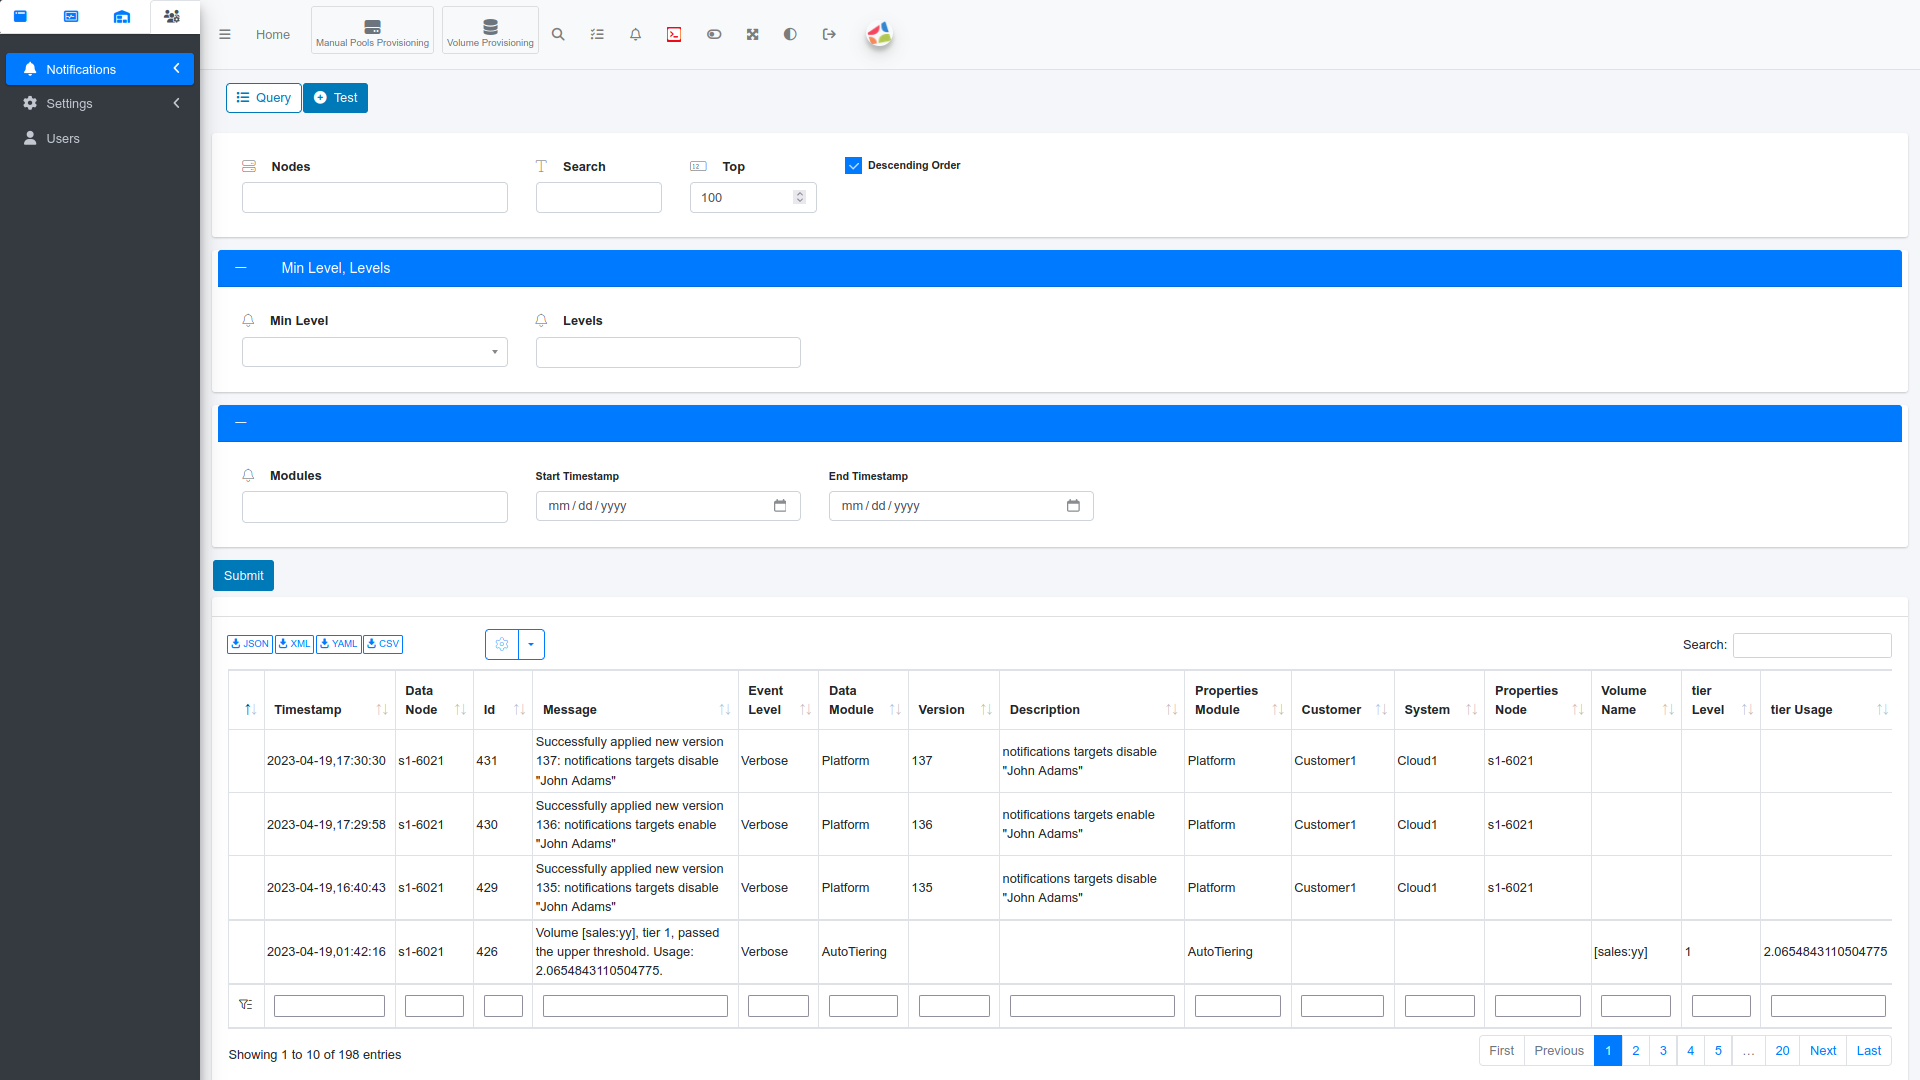
To query the S1 system, select Administration  > Notifications
  and fill in the filter boxes. All filter boxes are optional, however, for level of notification you can either chose Min Level or Levels.

| Filter box | Functionality |
|---|---|
| Min Level | Select a hierarchical notification level. |
| Levels | Select a specific notification level. |
| Modules | To filter the notifications by a module, select between: Notifications, Platform, Resources, Snapshots, Thin Provisioning, HighAvailabilty, Replication, AutoTiering, Networking, Licensing, Encryption, FileSystem |
| Start/End Timestamp | To filter notifications by date, select Start and End timestamps to specify the starting and ending dates. |
Select Submit to apply your filters. All notifications will appear in
the notification table. Use the filter box under each column to filter
the table according to the header of that column.

Use the Choose columns  control to hide or display columns.
Select  to export the table to a
JSON, XML, YAML, or CSV file type.
Configuring outgoing email address
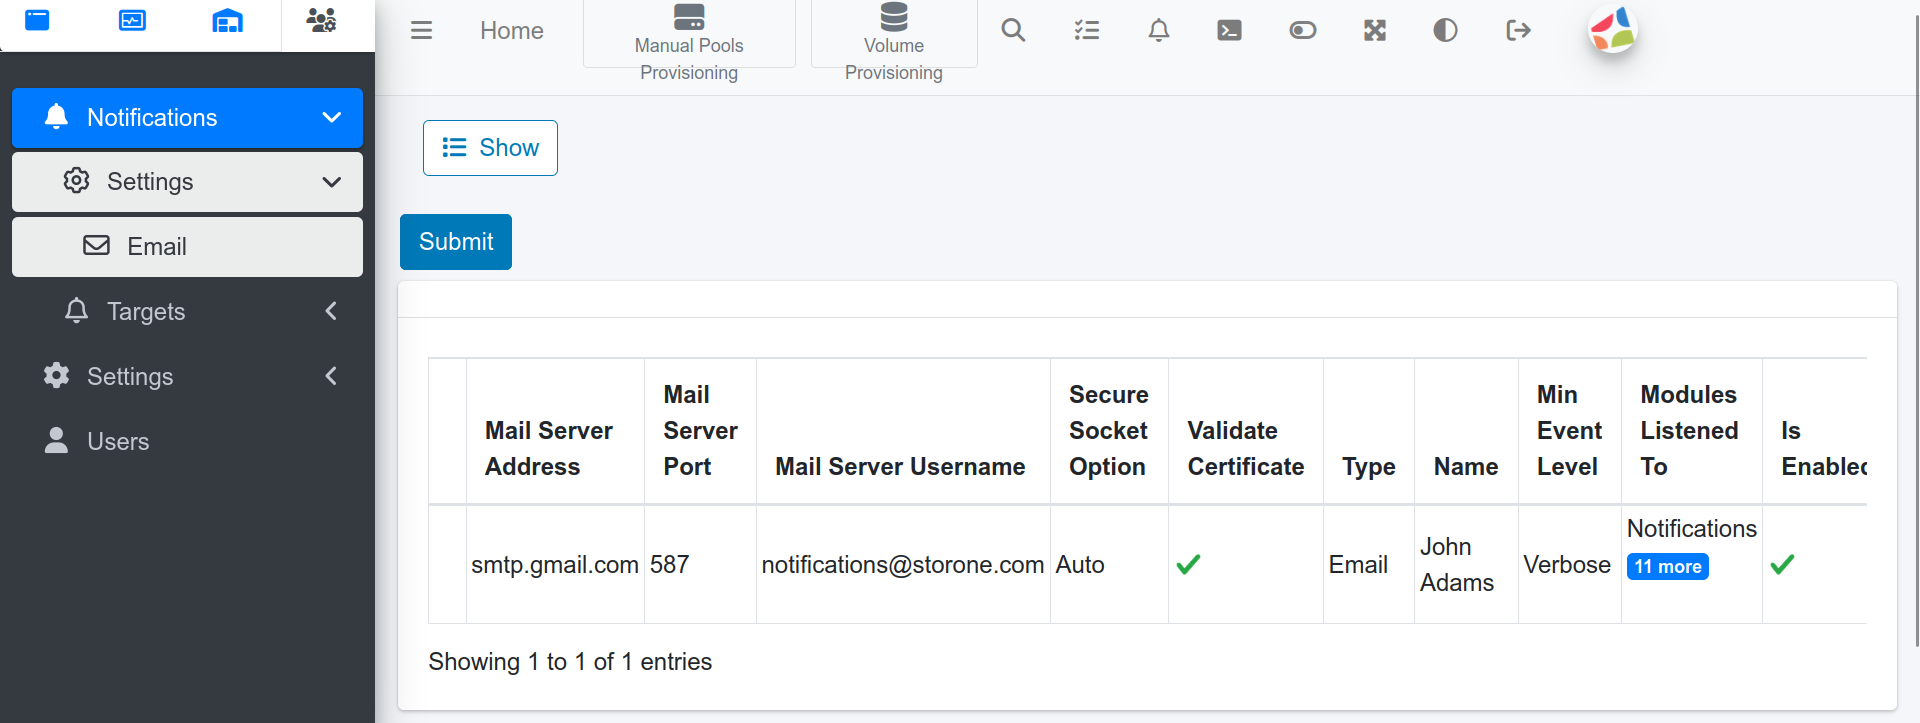
To display outgoing and incoming email addresses, select:
Administration  > Notifications
 >
Settings
 ![]()

Edit outgoing email address
- To display the outgoing email address select:
Administration > Notifications
  > Settings
  >
Email
- To edit the outgoing email address, select the Edit control and
expand the Editable settings control. Fill in the server details for the
outgoing mail:
- Server: Outgoing mail server address.
- Port: Outgoing port number.
- Secure Socket Option: SSL, TLS, Auto, none, or TLS when available.
- Disable certification validation: To allow the mail server to use a self-signed certificate. Use this option if the mail server does not have a certificate authority (CA) signature and you trust the mail server.
- Enable certificate: To validate the CA signature of the mail server.
- Username: Mail server user name.
- Password: Mail server password.
- Send from address: The email address to use for sending notifications.
To remove the outgoing email:
- Expand the Remove Username And Password | Remove send from address control.
- Check the Remove Send From Address
- Select Submit.
To remove only the user name and password of the outgoing email:
- Expand the Remove Username And Password | Remove send from address control.
- Check the Remove Username And Password.
- Select Submit.
To reset the outgoing email settings, all outgoing settings will be lost, select Reset and Submit.
Setting targets for system notifications
The Target section enables you to add, edit, or remove system notification recipients. It also allows you to set the notification level for each of the existing recipients and enable StorONE remote support.
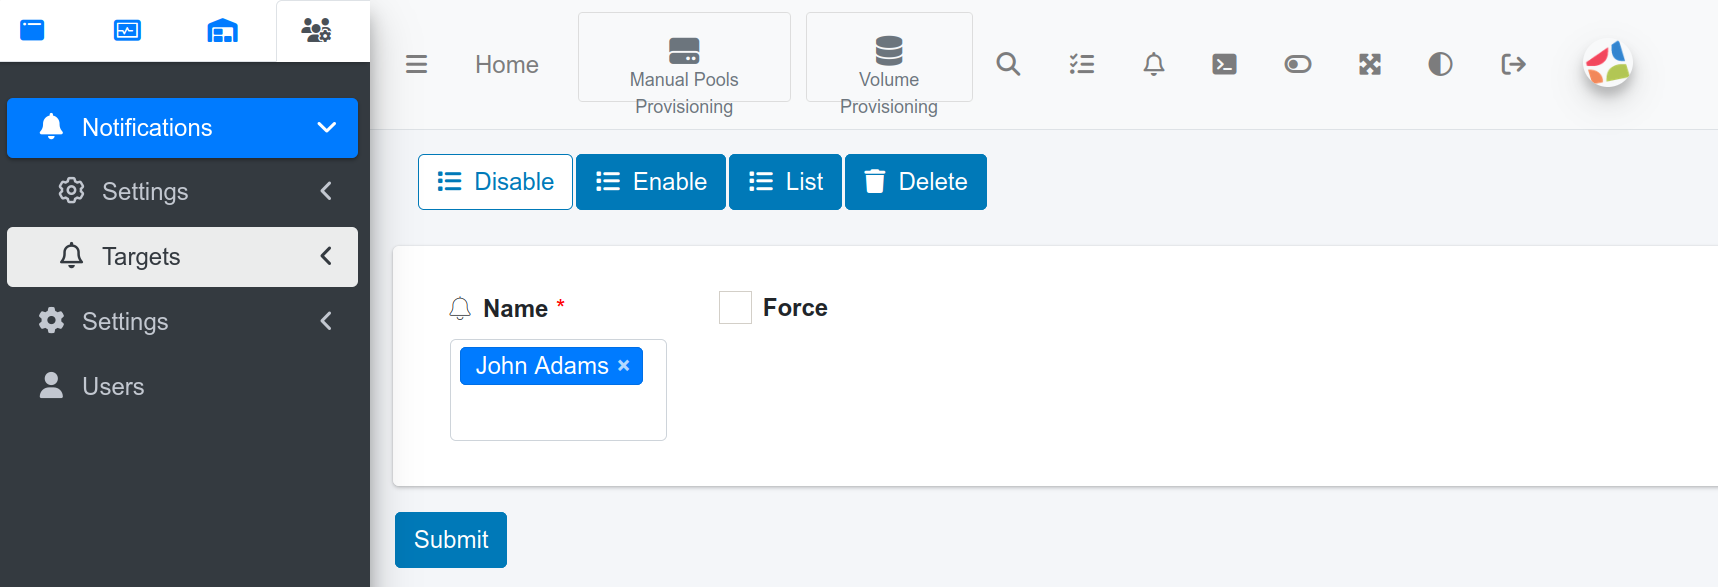
Disable, enable, and delete
-
To disable recipient from receiving system notification emails, select:
Administration >
Notifications
  >
Targets
From the Name control select the name of the recipients that you want to disable and Submit. Optionally, you can force the disable operation by checking the Force checkbox.
-
To enable notification messages for existing recipient;
- Select Enable.
- From the Name control, select the name of the recipients that you want to enable and Submit. Optionally, you can force this operation by checking Force.
-
To display a table of all system notification recipients, select List. You may also filter the table by selecting recipient from the Name control.
-
To delete system notification recipients;
- Select Delete
- From the Name control, select the name of the recipients that you want to delete and Submit.
Adding and editing system notification recipients
-
To add a system notification recipient, navigate to Administration
 >
Notifications
  >
Targets
  >
Email
  .
.- In the mandatory Email textbox fill in the recipient’s email address.
- Optionally, enter a name for the recipient in the Name textbox.
To configure system notification for the newly created recipient, expand the recipient notification settings by selecting +.
- Min Level: Select the level of notification, options are: Verbose, Debug, Information, Warning, Error.
- Modules: Select the module that you want to notify about. Options are: Notifications, Platform, Resources, Snapshots, Thin provisioning, High Availability, Replication, Auto Tiering, Networking, Licensing, Encryption, File System, All.
- Batch Posting Limit: Select the maximum number of events to post in a single batch. You must select a value that is greater than zero.
- Batch Posting Period: Select a desired time interval gap (in seconds) for the system to check between batched events.
-
To edit an existing system notification recipient, select edit. In the edit screen, select the name of the recipient that you want to edit from the Name control box.
- To modify the email address, insert a new email address in the Address textbox.
- To modify the name of the recipients, insert a new name in the New Name textbox.
- To modify each of the system notification settings, expand the plus icon and separately modify the Min Level, Module, Batch Posting Limit, and Batch Posting Period fields.
- To disable system notifications for the recipient, select Disable, Enable, check the Disable checkbox and Submit.
- To enable system notifications for the recipient, select Disable, Enable, check the Enable checkbox and Submit.
Adding and editing Seq server recipient
Seq, also known as Seq Anomaly Detection System, is a software tool that uses machine learning algorithms to detect anomalies in time series data. If you have an Seq server, the S1 system can send system notifications to your Seq server. You can then get S1 system notifications from your Seq server.
- To add an Seq system notification recipient, select
 Administration > Notifications
  >
Targets
  > Seq
> Seq

- Server Url: Insert the URL of your Seq server.
- Name: Recipient name in the S1 system. Pick a unique name. To configure system notification for the new Seq recipient, expand the + icon and set the notification-settings.
- To edit an Seq system notification recipient, select Edit.
Select an existing Seq recipient to edit.
- To modify the Seq server URL of the recipient, enter the new URL in the Server Url field.
- To rename the Seq recipient, enter a name in the New Name field.
- Expand the + sign to modify the Min Level, Module, Batch Posting Limit, and Batch Posting Period fields.
- To disable system notifications for the Seq recipient, expand Disable, Enable, check the Disable checkbox and Submit.
- To enable system notifications for the Seq recipient, expand Disable, Enable, check the Enable checkbox and Submit.
Adding and editing Slack targets
Slack is a popular team communication and collaboration platform that offers a range of features to improve productivity and streamline workflows. It allows users to create channels for specific teams, projects, or topics, and facilitates direct messaging between individuals or groups. In addition to its built-in functionality, Slack also offers integration with a wide range of external software tools, allowing users to receive notifications from these tools directly within the Slack platform.
-
To add a Slack recipient to the S1 system, select: Administration
 >
Notifications
  >
Targets
  >
Slack
- Server Url: Enter the URL of your Slack service.
- Name: Enter a unique name for the Seq recipient. To configure system notification for the new Slack recipient.
- Expand the + icon and set the notification-settings.
-
To edit a Slack system notification recipient, select Edit and then select the existing Seq recipient that you want to edit.
- To modify the Slack server URL of the Slack recipient, enter the new URL in the Server Url field.
- To rename the Slack recipient, enter a name in the New Name field.
- Expand the + icon to modify the Min Level, Module, Batch Posting Limit, and Batch Posting Period fields.
- To disable system notifications for the Slack recipient, expand Disable, Enable, check the Disable checkbox and Submit.
- To enable system notifications for the Slack recipient, expand Disable, Enable, check the Enable checkbox and Submit.
Adding and editing SNMP target
Simple Network Management Protocol (SNMP) is a widely-used protocol for managing and monitoring network devices such as routers, switches, servers, and printers. SNMP is an application layer protocol that enables network administrators to manage and monitor network performance, identify and troubleshoot issues, and configure network devices remotely. SNMP works by sending messages called “protocol data units” (PDUs) between SNMP-enabled devices. These messages contain information about the device’s status, such as CPU usage, memory usage, and network traffic.
SNMP also allows administrators to set thresholds for certain parameters and receive alerts when those thresholds are exceeded. This makes it easier to proactively monitor network health and address issues before they become major problems.
-
To add an SNMP recipient to the S1 system, select: Administration
 >
Notifications
  >
Targets
  >
SNMP
- IP: Enter the manager IP address through which the SNMP protocol will be used.
- Manager port: Enter port number for the IP address.
- Community String
- Trap Version A trap refers to a message that an SNMP agent sends to an SNMP manager to notify it of a significant event, such as a system failure or a threshold being crossed. Use the Trap version list to select trap version V1, V2, or V3 from the list. If you choose to use V3, then you need to do additional settings, see below.
- Min Level: Select the level of notification, options are: Verbose, Debug, Information, Warning, Error, Fatal.
- Modules: Select the module that you want to notify about, options are: Notifications, Platform, Resources, Snapshots, Thin provisioning, High Availability, Replication, Auto Tiering, Networking, Licensing, Encryption, File System, All.
- Name: Select a name for the SNMP recipient that you want to add.
If you choose to use V3 trap version (in the Trap Version down-drop list), then expand the V3 Context, V3 Username, V3 Auth Phrase, V3 Privacy Phrase section to configure the V3 trap protocol.
- V3 Context: Enter free text that will be used whenever an SNMP-V3 trap is sent.
- V3 Username: To use the SNMP-V3 authentication security level (authNoPriv or authPriv security level), enter the user name in the V3 Username textbox.
- V3 Auth Phrase: To use the SNMP-V3 authentication security level, enter the password in the V3 Auth Phrase textbox.
- V3 Privacy Phrase: To use the additional authPriv security level, enter the authPriv password here.
- To edit an SNMP system notification recipient, select Edit and the SNMP
recipient name:
- New Name: To rename the SNMP recipient.
- SNMP Settings: Expand the + icon, to modify SNMP notification settings.
- Disable, Enable: To disable or enable the SNMP recipient.
- To complete the edit, select Submit. Changes only take effect when selecting Submit.
Adding StorONE support
StorONE support can be added to the system notification recipients. To
add StorONE support, select: Administration  >
Notifications
  >
Targets
 ![]() > Storone Support
> Storone Support
![]() and then select Submit.
and then select Submit.
To remove Storone Suport recipient, select: Administration
 >
Notifications
  >
Targets
 ![]() .
From the Name drop-box list, choose storone_support and Submit.
.
From the Name drop-box list, choose storone_support and Submit.
Adding and editing Syslog targets
Syslog is a protocol used for sending log messages within a network.
It allows devices such as servers, routers, switches, and firewalls to
send event messages to a centralized logging server. The messages can
then be analyzed, monitored, and used for troubleshooting and security
purposes. Syslog messages include information about the source of the
message, the severity of the event, and other metadata that can help
identify and resolve issues.
To send messages from S1 to your server through Syslog protocol, add a new
Syslog recipient by selecting  >
Notifications
  >
Targets
 ![]() > Syslog
> Syslog
![]() .
.
- Connection Type: Choose an underlying transport protocol for transmitting log messages. Options are:
- TcpSyslog: To use the Transport Control Protocol (TCP).
- UdpSyslog: To use the User Datagram Protocol (UDP).
- Name: Enter a unique name for the Syslog recipient.
Expand the + icon to complete the Syslog settings:
- Server Address: Enter the IP or the URL address of the server that you intend to communicate with.
- Server Port: Enter the port number of your server.
- SSL Protocol: Enter the Secure Socket Layer (SSL) encryption algorithm of your server. Options are: None, SSL2, SSL3, TLS, Default, TLS11, TLS12, TLS13.
- Min Level: Select the level of notification, options are: Verbose, Debug, Information, Warning, and Error.
- Modules: Select the module that you want to notify about. Options are: Notifications, Platform, Resources, Snapshots, Thin Provisioning, High Availability, Replication, Auto Tiering, Networking, Licensing, Encryption, File System, and All.
- Batch Posting Limit: Select the maximum number of events to post in a single batch. You must select a value that is greater than zero.
- Batch Posting Period: Select a desired time interval gap (in seconds) for the system to check between batched events.
To edit Syslog recipient, select edit
![]() and then choose the Name of the Syslog recipient to edit.
and then choose the Name of the Syslog recipient to edit.
- Connection Type: Choose between TCP or UDP as an underlying transport protocol for transmitting log messages.
- New Name: To rename the Syslog recipient.
Expand the + icon to edit the Syslog settings.
- To disable system notifications for the Syslog recipient, expand Disable, Enable, check the Disable checkbox and Submit.
- To enable system notifications for the Syslog recipient, expand Disable, Enable, check the Enable checkbox and Submit.